
Installing flashing for a through-the-roof radon pipe is often a major concern for many people due to the potential for leaks. However, as you’ll see below, it’s actually quite straightforward to install flashing correctly.
Some people also have a fear of heights, and rightly so. A fall from any roof can be fatal. So, without going into too much detail about safety, please prioritize your safety. If you’re in doubt, consider hiring a handyman to perform this task for you.

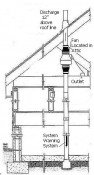
Decide where the fan will go in the attic and run the pipe. From your vertical section of pipe where the fan will mount use a plumb bob to find the center of the pipe on the underside of the roof deck. Drive a nail up through the shingles above.
Note: Positioning the fan close to the roof deck cuts down on the amount of condensation that the fan has to deal with. Insulating the pipe below the fan will help to reduce condensation also. We normally have no more than 24" pipe above a fan.
Let's head to the roof....

Prepare to cut the hole in the roof. Notice the nail protruding from the center of the red circle.
Tip: A cushion isn’t an approved safety device, but it can help prevent a person from sliding off a steep roof. It’s also great for keeping your tools on the roof. However, a cushion will never replace a safety harness..

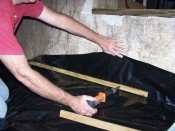
I use a scrap of pipe and crayon to mark the hole. The hole needs to be approximately 1 inch wider, and depending on the roof pitch, it will be 1 to 3 inches wider on top and bottom. Therefore, the hole will end up being oval in shape.

Before cutting the hole, ensure that that the fan is covered. A nail dropped into the fan can easily damage the impeller when it’s turned on.

Now you need to carefully loosen all shingles at the glue strip with a flat pry bar. Laying the flashing over the over hole will also help you to see which nails need to be removed. In this situation nails found at the row where the pry bar is will need to be pulled and under the next row down.
Note: You should end up with an oval shaped hole. This allows the pipe to come through the roof plumb.

Now slip the flashing up under the the first row above the hole. With your eye or a plumb bob get the flashing squarely over the fan opening below.Now remove the piece following the curve of the flashing. Cut less to start with...then trim to perfection after the first piece is removed.
Tip: Tin snips work great on cold or old brittle shingles.

With the upper shingle properly cut use this as a pattern to cut the row below. You will always want to remove at least parts of 2 rows so the majority of the sides of the flashing are up under the shingles.

Using a high-quality roof caulk, apply a thick bead around the entire hole. Cut a piece of pipe long enough to have at least 12 inches protruding above the roof.
Note: The rubber coupling on the top of the fan can be seen just a few inches below the roof deck.
Insert the pipe into the flashing so it's flush with the bottom. Now the flashing can be slipped up under the shingles. Try to hold it above the caulk as you slide it up. Use a helper down below to secure the rubber coupling as you help push the pipe into the coupling. Before tightening the coupling make sure the radon vent is plumb.

Nail the bottom edge of the flashing and add a couple more up under the shingles on the sides. I like to caulk up along the sides of the flashing where possible and under all loosened shingles, where nails were pulled, and any exposed nail heads. No need to go crazy with nails as the caulk below will hold the flashing in place also.

Finally add the varmint guard to protect the fan from acorns, hailstones and critters. Painting the pipe a dark color will keep ice formation to a minimum during the winter.

Design Pages |
Sep 30, 24 12:23 AM

May 20, 24 09:37 AM
Mar 21, 24 06:46 PM
By Val Riedman Copyright © 2007-2025 Indoor-Air-Health-Advisor.com
Build Your Own Website with Solo Build It!

New! Comments
Have your say about what you just read! Leave me a comment in the box below.