by Ron Reynolds
(Columbus, OH)

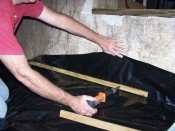
Basement floor penetration and covered pedestal sump pump

|

|

|

|
My newly purchased townhouse condominium in Columbus, Ohio came with a radon level of 8.6 in the finished part of the basement.
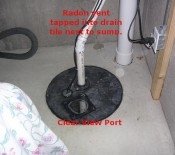
I dislike submersible sump pumps that that need to be replaced every 5 years and much prefer pedestal sump pumps that may last for 25 years or more. Therefore, I replaced the existing submersible pump with a pedestal pump and bought a plastic horse feed bucket from the local Tractor Supply to cover the pump.
The upside-down bucket rim was caulked to the floor, and I used a hole saw and Val's rubber grommets to seal the discharge and electrical lines. I cut a rectangular access hole in the top and put a piece of Plexiglas over to make a view and access port.
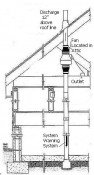
After a lot of searching I found both a chimney chase and a plumbing chase all the way from the basement to the attic, but the condo association would not allow me to do a roof penetration. I was forced to go up the 2-story back wall on the outside, but the only two places that I could avoid mechanicals and go through the rim joist came out either in the middle of the back steps or under a window. The condo association did finally allow me to drill a 5" hole through the poured concrete wall in the corner of the basement adjacent to the sump discharge.
I chose to hire a company to drill both it and the floor penetration. There was loose one-inch crushed limestone under the floor, so it was fairly easy to take 5 gallons out under the floor penetration.
I used 1/2" foam backer rod to center the 4" pipe in the 5" holes and sealed both with hydraulic cement. I found that the local Lowe's sold 4" Schedule 40 PVC in a "non-pressure" version with foam inside the wall. It was half the weight, cut and glued easily, and should insulate the long outside run pretty well.
Since it was in the 20's outside as I was doing the installation, I glued up the riser inside. The only joint that I needed to glue outside was the first 90° elbow after coming through the basement wall. I used a hairdryer to heat both sides of the joint before gluing.
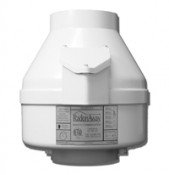
I left an intentional 1-1/2" gap (covered with a white flexible coupling) between the top flange of the fan and the bottom of the riser to allow for fan replacement without having to remove the two-story riser. 1-1/2" of riser was allowed above the coupling before the first 45 so that the coupling can slide up and expose the gap between the top fan flange and the riser. I also used some silicone garage door spray to lubricate the inside of the white flexible couplings above and below the fan to make them easier to remove in the future.
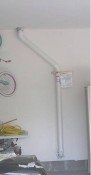
To attach the riser pipe to the wall, I used a plumb bob to stay vertical, and used Val's brackets and stainless steel lag bolts that will not rust in the future. To ease installation of the pre-assembled riser, I used a one-handed bar clamp to draw the top bracket around the pipe and hold it in place while I secured the bolt and nut.
The installed system brought the radon level down to 1.0.
Comments for Covering a pedestal sump pump, using foam core PVC pipe
|
||
|
||
|
||
Design Pages |
Mar 13, 26 12:12 PM
Dec 21, 25 04:24 PM
Nov 24, 25 11:11 PM
By Val Riedman Copyright © 2007-2025 Indoor-Air-Health-Advisor.com
Build Your Own Website with Solo Build It!