Satisfied Fort Collins CO
Radon Mitigation DIYer
by R. Larson
(Fort Collins, CO)

Attic Radon Fan Installation
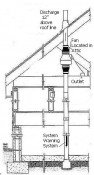
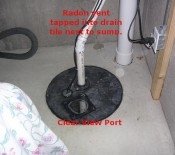
My radon levels have been creeping up from 5 pC/L when I purchased my house in 2002 to over 18 pC/L in 2010. I test both floors annually during the winter, when radon levels are highest. I decided it was time to reduce the radon amount before it literally killed me. Our neighborhood lost several young senior smokers during the last several years, which I believe radon contributed to their deaths. I'm lucky in that I purchased a home with a radon passive pipe system already installed in a gravel bed, which is preferred. But through time, the slab was cracking at the perforations, and radon was likely seeping through the cracks.
I purchased a local Colorado radon book "Protecting Your Home From Radon 2nd edition." It's the ultimate DIY book for radon mitigation systems for any type of foundation. Lots of great info in 12 chapters (225 pages) and suggestions not only on design and installation, but a whole chapter on safety. Working in the attic with the dust, insulation, radon, and using PVC glue can be very toxic to your lungs and body, so I used a charcoal type air respirator from past home projects along with protective glasses, latex gloves, and old clothes for the pipe gluing part. These safety items are a must if you're slightly allergic like I am.
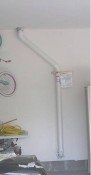
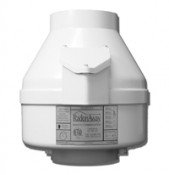
I scanned the Internet for more info and found Val's Internet website, which had additional info beyond the mentioned book on selecting fans and other tips on radon parts. I called Val and discussed the fan sizes and radon parts with him and he recommended the RadonAway RP145 fan, a popular five year warranty fan. Val was very helpful on how many 90 degree bends not to use and painting the roof exit pipe black to prevent condensation in winter areas, insulating the upper pipe in the attic to prevent condensation, using the same diameter size pipe as the fan output diameter size instead of using a reducer and smaller roof exit pipe,
U tube Dynameter, and sealing the cracks in my slab (unfinished part of my basement) to prevent back-drafting. Back drafting can be a problem in older homes and cause carbon monoxide if you have a lot of gas (furnace, water heater, stove, dryer, etc.) appliances when using a radon fan.
It took me about twelve hours to design and complete the installation last week. I also bought the popular
Safety Siren Pro Series III Radon Detector, which I recommend. I bought it over a month ago and started measuring all rooms in my home. I found it to be slightly more accurate than the charcoal packs that most cities sell. But the charcoal packs are worth using if you don't want to pay
more for the electronic radon detector. The electronic detector is handy to have as it constantly measures the radon levels, much like a carbon monoxide detector, which is also highly recommended after the installation.
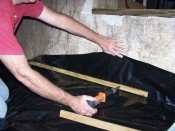
I purchased the pipe parts and roof jack (flashing) at a local home improvement center and hardware store besides the fan and other parts from Val for about $225. Please see the photo of my radon installation. I don't show the six inch insulation around the upper pipe in the photo, but it's there. You can use smaller insulation, but I had the six inch insulation left over from insulating my garage attic. I also used a threaded brass fitting barb for 1/8 plastic tubing to connect to the U tube Dymameter instead of drilling a hole in the radon pipe in the basement and using silicone. I bought extra warning labels, but didn't need them as the Dynameter and fan has enough warning labels included, even for the electric outlet.
One extra thing I did was clean out the existing radon pipe with a shop vacuum cleaner. Since the radon pipe exited only into the attic, I sucked out some attic insulation and debris that had fallen inside the pipe. The radon fan also sucked out some debris, which shows you the suction power the fan has.
After finishing the installation, I set up my electronic radon detector on the main floor. After five days, the levels came down to under 3 pC/L and I was very satisfied. I moved the radon detector to my basement family room, where the levels are now at 2 pC/L. Radon gas takes about four days to dissipate or you can use a house fan in your window for faster dissipation. These detector levels are measured using the short term test method. EPA recommends to use a long term test for higher accuracy, which I'm doing now, but it takes several days longer.
I calculated that the
RP145 fan uses $3 per month in electricity, which is cheap considering the alternative. Incidentally, the RP145 fan is very quiet.
Overall, I'm very happy with the installation, Val's help, and the Colorado radon book's recommendations. I have peace of mind for my family and pets. Be sure to tell your friends if they have tested their homes for radon, especially if you live in a high radon area. I've been pushing our city's air quality dept. and area newspapers to promote radon testing. I feel it's our civic responsibility to let our relatives, friends, and the public know that radon gas can be very harmful!
Call Val for radon install tips. He used to live in Colorado and knows the radon subject in detail. I even sent him him a donation for his great tips! Thanks Val!